Virtual Printer
We offer a VirtualBox image to help developers test their systems without actual hardware. VirtualBox is a free open-source cross-platform virtualization solution which runs on Windows, OS X, Linux and Solaris.
Note
This is a tool primarily targeted for developers. We do not offer generic Windows/VirtualBox support.
Prerequisites
- Computer with VirtualBox and a minimum 4 GB of RAM. 8 GB or more is recommended. WinSCP and PuTTY are useful but not strictly necessary.
- VirtualBox Documentation
Download and Installation
- Download the latest appliance from our VirtualBox Appliance
Download Area. The file is named
focal_amd64-X.Y.Z.ovawhereX.Y.Zcorresponds to version of the Evolabel Markerapp Software. - In VirtualBox, select and browse to the downloaded ova file.
- When importing the appliance, please select Generate new MAC address for all network adapters. This prevents IP conflicts if more than one virtual printer is connected to your network.
Updating the Virtual Printer
It is possible to update the Evolabel Markerapp Software inside the virtual printer using the Software Update menu in the SETTINGS view. However, upgrading to a Marker version that is equal to, or exceeds the next available appliance version is not supported.
For example, given the two appliances xxx-0.28.3.ova and xxx-0.29.8.ova, upgrading Evolabel Markerapp in xxx-0.28.3.ova is supported up to and including version 0.29.7. In order to update to 0.29.8 and above, the newer appliance xxx-0.29.8.ova should be used.
Screen Resolution
If you are unable to see the whole touch screen in the VirtualBox window, ensure that in the VirtualBox menu, is checked.
You can now resize the window and the touch screen contents will fill the new size. The native size of the touch screen interface can be selected from .
Note
The UI can expand freely, but the width will only shrink in small increments, so if you want to shrink the window from a large size you may have to repeatedly resize the window until the UI is able to fit the window size.
Note
On some Windows hosts the Auto-resize Guest Display option does not work. A workaround is to set the display resolution directly in the virtual machine:
- Login into the UI as administrator by tapping the Log In button and enter
9987. - Close down the UI by tapping Restart from .
- When the restart dialog appears, press Cancel.
- From the desktop inside the virtual machine, select the start menu (with the Evolabel logo) Settings Manager.
- Select the Display applet, and set Resolution to 1024x768.
- Press Apply and start the printer UI by tapping the MarkerApp button in the bottom toolbar.
Networking
In order to be able to control the virtual printer via network, you will have to configure the VirtualBox guest to use either a bridged network adapter, or a host-only network adapter.
Bridged Networking
Connecting the virtual printer using Bridged Networking will create a virtual network adapter bridged to the selected physical network adapter. This will allow your and other computers on the network to access your virtual printer.
![digraph BridgedNetworking {
node [shape=box fontname=Sans fontsize=9]
LAN [fixedsize=true width=2 height = 0.3]
LAN -> computer [dir=none]
computer [label="Your Computer" fillcolor=lightblue style=filled]
vp [label="Virtual Printer" fillcolor=navajowhite style=filled]
LAN -> vp [dir=none]
LAN -> "Other Computer" [dir=none]
subgraph cluster_c1 {
{rank=same; computer vp}
computer -> vp [style=invis]
style = dashed;
computer;
vp;
}
}](_images/graphviz-e0f6c3e1499d7bf526708883fa9e3b0768e5bd44.png)
Note
- You need to select the physical network adapter connected the network that you intend to connect your virtual printer to.
- If your network has a DHCP server the virtual printer will get an IP address automatically. Otherwise you will have to configure a static IP address on your local network.
Host-Only Networking
If you don’t need or want to expose the virtual printer on the rest of the network you can use a host-only network adapter. Note that this means that other computers will not be able to access the virtual printer.
![digraph BridgedNetworking {
node [shape=box fontname=Sans fontsize=9]
LAN [fixedsize=true width=2 height = 0.3]
LAN -> computer [dir=none]
vboxnet0 [fixedsize=true width=1 height = 0.3]
computer [label="Your Computer" fillcolor=lightblue style=filled]
vp [label="Virtual Printer" fillcolor=navajowhite style=filled]
computer -> vboxnet0 [dir=none]
vboxnet0 -> vp [dir=none]
LAN -> "Other Computer" [dir=none]
subgraph cluster_c1 {
style = dashed;
vp;
computer;
vboxnet0;
}
}](_images/graphviz-462ef4d0d034eca2961b7cabbb9ba2205c803837.png)
To create a host-only network in VirtualBox:
- Open Oracle VM VirtualBox Manager
- Navigate to and click the Create toolbutton to create vboxnet0.
Applying Network Settings
Open Oracle VM VirtualBox Manager
Select your virtual printer and then click on Settings.

Click Network and ‘Adapter 1’ tab.
- Enable Network Adapter
- Attached to: ‘Bridge Adapter’ or ‘Host-only Adapter’ as described above.

After you have made changes to the virtual networking setup, you may have to request a new DHCP address for the virtual machine.
In the Virtual Printer UI, log in with password 9987 and go to and tap Restart Network Service
USB
Support to access USB storage devices can be enabled in the virtual printer.
The virtual machine should be stopped
Open Oracle VM VirtualBox Manager
Select your virtual printer and then click on Settings.
Click USB and select Enable USB Controller
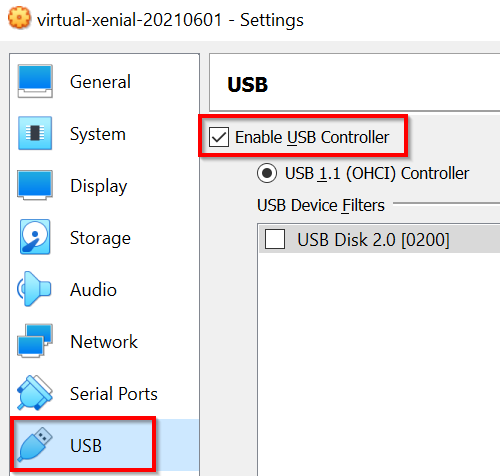
Click OK at the bottom right of the screen to close.
Open your virtual machine.
Now, there is a USB icon at the bottom of the screen.

Insert the USB Storage device on one of the USB ports on your PC
Right click on the USB icon. The USB Storage device is listed as an USB disk. Select the USB disk
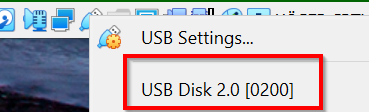
The USB icon in the upper right corner, tells that the USB Storage device is available to the virtual printer.

The USB Storage device is no longer available from Windows.
Deselect the device (see step 9) to unmount the disk from the virtual printer and make it available in Windows again.
Troubleshooting
The Virtual Printer Does Not Start
On some PCs running Windows 11, we have seen that the virtual printer fails to start and there is no error message. The solution is to setup Oracle Virtual Box to emulate a 2 cores processor.
The virtual machine should be stopped
Open Oracle VM VirtualBox Manager
Select your virtual printer and then click on Settings.
Click System and then on the Processor tab and select 2 processors.
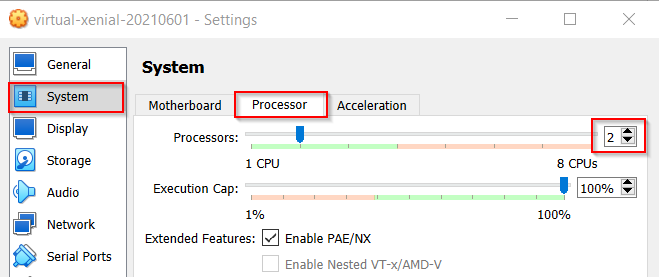
Click OK to confirm.
Solution for “VT-x is disabled in the BIOS”
By default the virtual machine is setup to mimic the target hardware which is based on a dual-core Atom processor. In VirtualBox, this requires VT-x which is enabled in the BIOS.
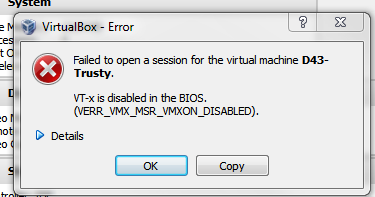
Reboot your computer and pay close attention to the first screen that appears. Look for a message that indicates which key you need to press in order to access the BIOS.
Common choices are: Enter, Delete, F1, or F2.
Inside the BIOS menu, find the setting that control virtualization and enable it.
The setting may be named “Virtualization Technology”, “Virtualization Extensions”, or something similar.
Find the choice for saving settings and reboot again.