NiceLabel Support
This document describes how to install and configure the NiceLabel Evolabel driver and how to set up the printer for ZPL support.
Tests have been performed using NiceLabel Designer Pro Version 17.3.1 (Build 2491) and the Nicelabel driver for Evolabel Version 7.8.30.14747 on Windows 10.
Printer Configuration
- Ensure that the ZPL Protocol Emulation is enabled. This is enabled by default.
- If the ZPL protocol was not enabled, please select it, then Restart the printer application for the change to take effect.
Note
By default, Evolabel printers ignore media settings as Speed, Darkness and Printing mode. In order to let NiceLabel control these parameters, disable the setting Ignore Media Settings under .
Driver Download
The driver is a free download from NiceLabel. Go to the NiceLabel Evolabel - Windows printer driver page and enter your contact information to download the installation file.
Driver Installation
Run the downloaded file
evolabel.exeand click Unzip to extract files. Press OK in the successfully unzipped dialog.At the User Account Control prompt, click Yes to start the Printer Installation Wizard.

Select Install Printer Driver and accept the license.
Select Network Port. The wizard will list the available printers on your local network. If you have connected printers but this list is empty, please see No printers are detected by the Printer Installation Wizard.
If the printer is located on another subnet it will not be automatically discovered, but if you know it’s IP address, you can click Manual to install the printer and port manually.
Select the printer that you want to install a driver for and click Add.
Enter a descriptive printer name and click Install.
Driver Configuration
Open Printing Preferences, either from Windows Settings (Devices > Printer & Scanners) or from NiceLabel.
- Page Setup
- Make sure that the label size (Width and Height) matches the media loaded in the printer. Rotation controls the print direction on the label.
- Print Options
It is possible to control print speed, contrast (darkness) and printing mode (Direct thermal or Thermal transfer) from the driver.
To use the printer settings instead, use the green checkbox and select Let printer control this option.
- Speed
- Print speed. Note that speeds over 200 mm/s will only have effect on printers with High Speed activated. It is recommended to let the printer control this option.
- Darkness
- 0-20. Higher value gives more darkness. It is recommended to let the printer control this option.
- Printing mode
Only available for T43 and T63 models.
- Direct thermal
- Do not use thermal transfer mode.
- Thermal transfer
- Use thermal transfer mode.
- Send job only when online
- Evolabel® printers are possible to send jobs to even when they are offline. In order to emulate Zebra printer behavior, this option can be checked.
- Graphic Options
- The Printer graphic options should normally be set to Direct Print and ZIP.
Printing
Select the newly added printer in NiceLabel or any other Windows application and then print. The job will be downloaded to the printer. In order to print a label the printer has to be triggered. It is also possible to use the Print button on the touch screen or the control panel.
Tip
By default Force Unlimited Product Count is enabled.
If Force Unlimited Product Count is disabled, the actual Print Count sent from NiceLabel will be used. Any new jobs sent from NiceLabel will be queued.
In order to clear the Job Queue, tap Clear Jobs on the Operation tab.
Store and Recall
It is possible to create a layout in the NiceLabel Designer with variable references, store it persistently in the printer and recall and populate the variables at a later time from XML or JSON-RPC.
To get named variable references to work we are using the prompt functionality.
Create a text field with a variable reference
Select the text field and find the Properties windows. Right-click and select Properties, or press F4.
In the Source tab find the Connected data source: drop down list and select .
Enter
testas variable name and press Create variable.Next find and check the checkbox.
This enables the Prompt text input box where you can enter the variable name that you want to reference this field with. For simplicity, we use the same prompt as the variable name:
test.Switch to the Style tab and select the
EL FreeSansprinter font. This is necessary in order to be able to keep the text field variable. Otherwise the text field will be stored as graphics and will not be possible to change.
Tip
This workflow can be used for barcodes as well, but note that Nicelabel puts some limitations on variable references in GS1-128 barcodes.
In order to use variables in a GS1-128 barcode in a stored layout, select Code128
as Barcode Type. The barcode will be stored with GS1 mode "auto". In the recall
use parentheses/brackets to represent the GS1 data.
Example: (10)749123(00)173500538500000061
Store the layout in the printer
Select and click the Store to printer button.
This will download the layout to the printer using the label name. You can find the layout in the printer UI in The name will be in all caps and have the suffix
.ZPL.layoutadded to it. Assuming our test file is stored under the nameTest Labelthe stored name will beTEST LABEL.ZPL.layout. This is the name that shall be used when recalling the layout.
Recall the layout
Using JSON-RPC (port 50000):
{
    "method": "jobs.put",
    "params": {
        "pages": [
            {
                "copies": 1,
                "layout": "layout:TEST LABEL.ZPL.layout"
            }
        ],
        "product_count": 1,
        "variables": {
            "test": "Text"
        }
    }
}
Using XML (port 9200):
<?xml version="1.0" encoding="UTF-8"?>
<labels _FORMAT="TEST LABEL.ZPL.layout" _JOBNAME="test_job" _QUANTITY="1">
  <label>
    <variable name="test">Text</variable>
  </label>
</labels>
Using Commands Fonts
Command fonts are a way to embed control commands in a Nicelabel layout. This makes it possible to select printer profiles, change external settings and set job variables.
Tip
See the ZPL documentation for more information about Including Job Metadata.
Example: Profiles
Follow these steps to create a command font which makes it possible to change the active profile in the printer.
Open the Printer properties by locating the printer in Windows Settings (Devices > Printers & Scanners) and select Manage.
Select Driver Settings and Fonts.
Create a new command font: Add > Command…
Fill out the form as shown in this picture:
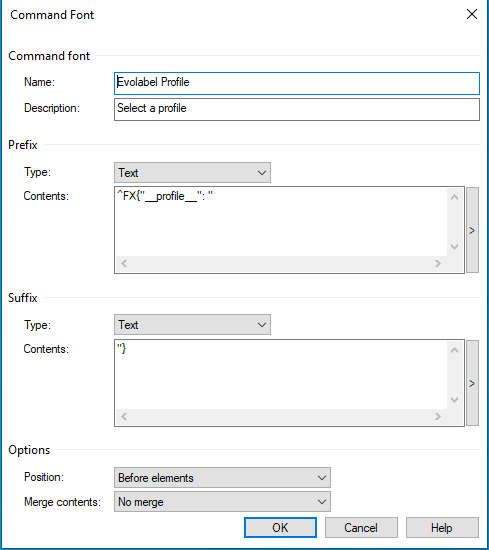
Prefix should read
^FX{"__profile__": "and suffix"}.Open a label in Nicelabel and create a text field using the newly created font Evolabel Profile. Type in the name of the profile that should be activated. This must already exist in the printer. In this example it is called
profile1. The field can be placed anywhere, even outside the label. It will not be visible on the printed label.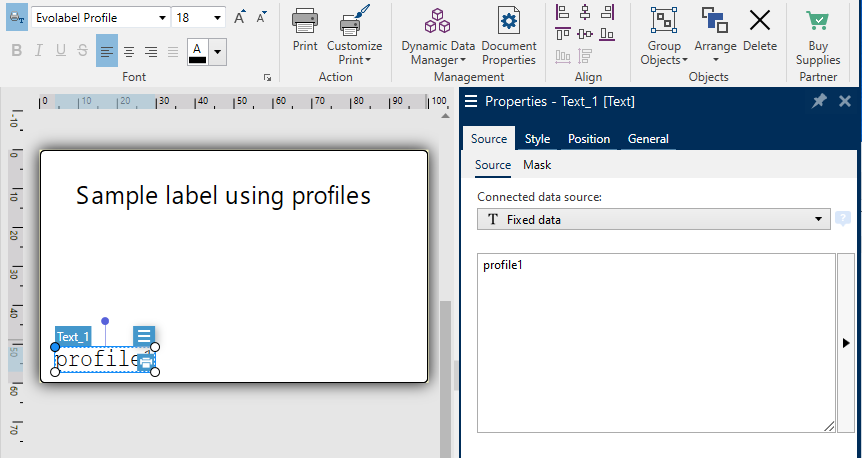
To make the profile dynamic it is possible to connect the field to a database source.
Troubleshooting
No printers are detected by the Printer Installation Wizard
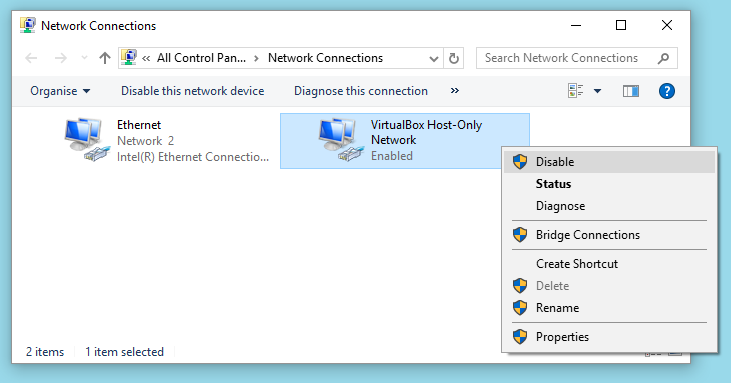
If you are using VirtualBox a possible explanation is a VirtualBox bug that prevents multicast traffic. This bug can be worked around by disabling the VirtualBox Host-Only Network connection.
- Locate the VirtualBox Host-Only Network connection under Network Connections. In Windows 10 you can find it from the start menu .
- Right-click the VirtualBox Host-Only Network item and select Disable.
For more information see: https://www.virtualbox.org/ticket/8698. Note that despite the bug being closed as fixed, this still seem to be a problem in current versions.
The print job is not sent to the printer and there is an error showing in the print spooler
- Make sure that the printer is online (started) if Send job only when online is checked in Driver Configuration.
- Make sure that the printer is connected to the local network.
- Check the network connection by pinging the printer IP address from the host computer. If there is no connection, make the necessary changes to the computer or printer network configuration.
How do I use bold or italic printer fonts?
When selecting a printer font for a text field in the NiceLabel Designer, the tab doesn’t allow setting Bold and Italic styles.
The B and I font style tools in the main toolbar will work.