Label Dispensing
I.e. separating the label from the liner and transferring the label to the applicator.
Separate the Label from the Liner
The dispensing edge is used to separate the label from the liner. When the label leading edge is at the dispensing bar the liner is stretched by the Rewinder unit and this releases the label leading edge from the liner.
For this to work there are a few thing needed:
- The dispensing edge must not be worn.
- The rewind torque must be correct
- Labels are not allowed to be too flimsy
- Label adhesive must not be hardened
Dispensing Edge
The dispensing edge is used to separate the label from the liner. On a new dispensing edge the labels are pulled over a firm edge making the labels separate from the liner.
A worn dispensing edge can lead to no or poor dispensing from the label liner and the label risks following the label liner to the rewind roller. A worn edge can also rip the label liner due to sharp edges arising from wear. Expected life span of the dispensing edge is approximately 3000 km.
Rewinder
The purpose of the rewinder is to keep the liner stretched during printing. Stretched liner is needed for the labels to separate from the liner at the dispensing edge. During media adjustment the labels should not be dispensed and then some slack is needed to the liner.
The rewind torque () defines how hard the liner is pulled over the dispensing edge. If rewind torque is too low the labels may not separate, if too hard the liner is ripped.
With rewind torque set to Auto, the printer tries to calculate the torque needed from various parameters including the label width. The printer cannot detect the physical label width, therefore the label width defined in the layout is used. If “layout width” differs from “physical media with” the Auto setting may add too little torque (label not dispensing) or too much torque (liner breaks). Preferably update the “layout width” to match the “physical label width”, or use manual rewind torque settings.
Media
During the dispensing, the media is separated from the liner. This is done by stretching the media over the dispensing edge. The label leading edge releases from the liner and is fed onto the applicator pad, the liner is rolled up on the rewinder.
- Flimsy media
- If the media is not stiff enough it may not separate from the liner.
- Hardened adhesive
- If the media is stored too long or in an incorrect environment (e.g. too warm), the adhesive may harden, preventing the label from separating from the liner.
- Curved labels
- Some labels tend to keep its curved shape (from the roll) even when unrolled. Such labels also tend to be harder to separate from the liner. The label follows the liner over the dispensing edge. Labels that are stored for a long time have a higher tendency to be curved. The labels also tend to be more curved to the end of the label roll (as the roll diameter decreases).
- Punched labels
- The media starts as large rolls of continuous media (i.e. without any gaps). The labels are then cut to size leaving the liner intact. If this machine is incorrectly adjusted, the label is pressed to the liner, laminating the label edge to the liner. The labels are then harder to dispense. This can be seen as punch marks in the liner and/or adhesive on the label edge.
Support Blow
The Support Blow function is important for blowing the label up to the pad when extruding. When support blow is on there should be a distinct and constant flow of compressed air.
On the support blow there are two air outlets. One through the brass nozzle and one through a small hole directed towards the applicator. Ensure there is compressed air through both outlets.
Print Roll
If the Print roll is dirty - the label may skid during feeding - or worn with recessions in the middle (occurs faster if labels of different width are used) the printer thinks the amount of steps are done but the labels have not been fed the required distance, hence not dispensed. If the amount of steps and expected distance to gap does not tune - the printer ignores if it happens randomly. So there is not necessarily any Warning or Alarm.
Back Feed
Back feed setting is located in The printhead dot line is located some distance before the label leaves the print head profile. This means that the printer must retract the labels in order to print on the leading edge of the next label. Back feed is a delay that controls how quick to retract the label. If the Back feed is too short the labels are retracted before the printed label has fully separated from the liner. The result is then that the printed label is retracted back into the printer and can therefore not be applied. The Back feed value to be used somewhat depends on the physical media used.
Feeding the Label onto the Applicator
Applicator Print Position
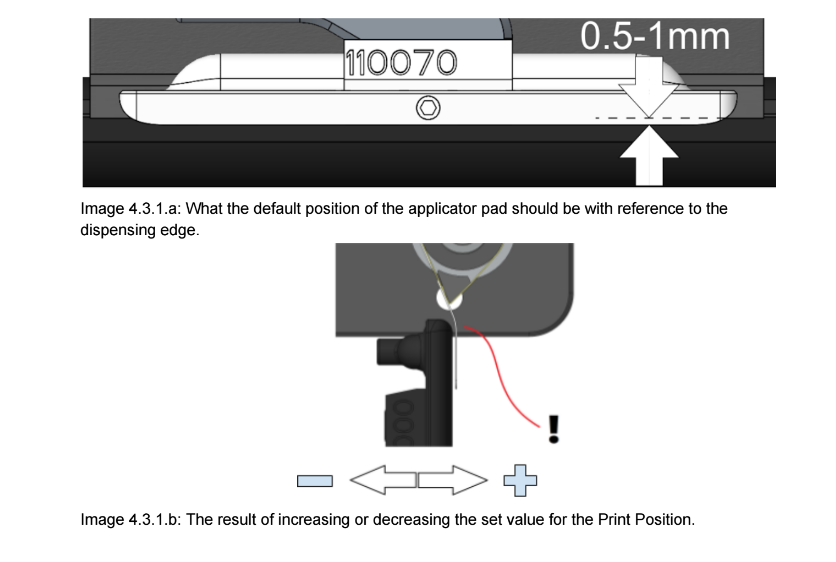
The applicator position may vary between applicator types (see manual for each applicator), but in general the applicator print position should be 0.5 to 1.0 mm below the top of the dispensing edge.
The point of having the pad this distance under the Print profile is that the label extrudes out in an arc and is blown up to the pad. It also helps the label to come loose from the liner and eventual adhesive strings. See the documentation for the specific applicator for instructions on how to set the Print position.

Applicator Pad
Which applicator plate to use depends on the labels used.
On the applicator pad there are a number of channels allowing under pressure (vacuum) to hold the label onto the pad. If a channel is open the under pressure will decrease significantly with less force holding the label as a result. In the worst case the label falls off the pad and will not be applied. If labels used that are narrower than the printer max label width, make sure that the labels are aligned with the applicator pad. I.e. that all the channels are covered when the label is held by the pad.
With reduced vacuum. the label apply accuracy may also be decreased as the label shifts on the pad during application.

Wrinkling
The label is nicely printed, but wrinkled after applied to the product.
As previously described, an under pressure (vacuum) is needed to attach the label to the applicator pad until it is applied to the product. A too large under pressure when the label is fed onto the applicator pad may cause wrinkling. Things to check:
- The air pressure is correct
- Air Consumption Reduction is on.
The applicator print position and worn (or dirty) applicator pad may also have an impact.
See applicator manual for further information.