Print Quality
Thermal PrintHead
Evolabel printers use thermal printing technology and consequently uses Thermal Print Heads. On the printhead, paper side, there are multiple tiny thermal elements that are usually referred to as dots. There are 300 dots per inch (DPI) which is 12 dots per mm. When a dot is heated up there is a corresponding coloration on the media.
The printheads used in the Evolabel printers are specially designed for the Evolabel. It is therefore not possible to use printheads from any other supplier than Evolabel.
What May Cause the Printhead to Fail Prematurely?
Apart from the printhead pressure and printroll these items may also have an impact on the printhead life.
- Media Wear
- Direct thermal printing requires that the printhead is in constant contact with the media. Some media have a rough surface that causes increased friction and may wear down the printhead prematurely. Always use high quality media.
- Thermal Stress
- The printhead dots are cooled down by the media during printing. There is a risk dots burn out prematurely of thermal stress not in good contact with the media. E.g. too low print head pressure or printing a 6” layout on a 4” media using a 6” printhead.
- Build Up
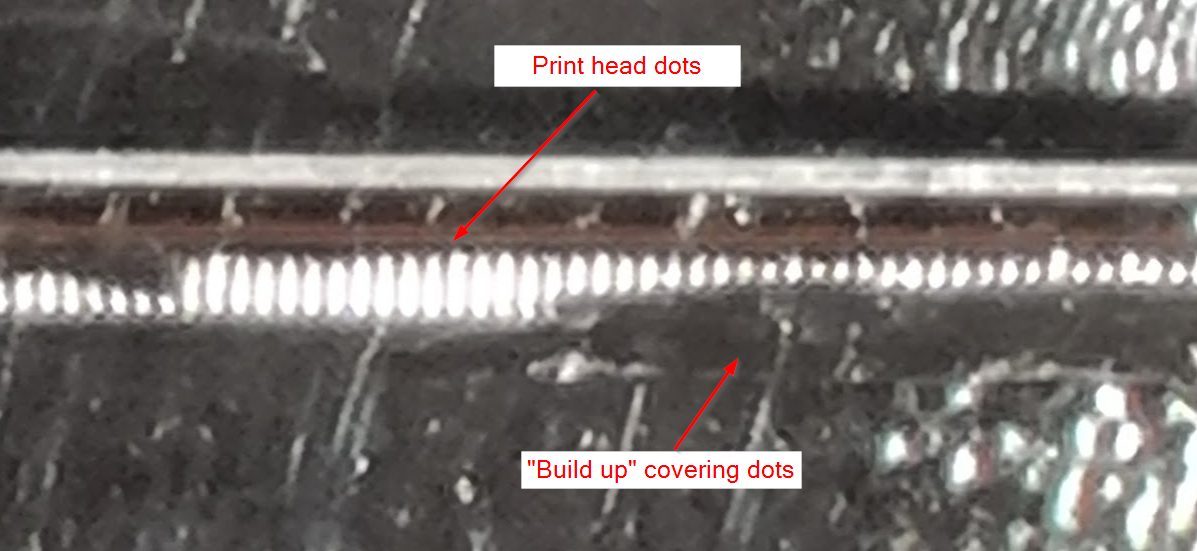
A faded printout may be caused by build up on the print head. Build up isolates the printhead from the media causing a light printout and risk to shorten printhead life

The build up may be caused by
high contrast in combination with some media and ribbon. The media top cover melts and sticks to the print head covering the dot line.
label adhesive bleeding out into the label gap
Once there is so much build up so it affects the printout it may be hard to remove. Regular cleaning of the printhead prevents the build up.
- ESD
- ESD (Electrostatic discharge) may under some circumstances be an issue. Especially in very dry conditions. Some ribbons may generate high amount of ESD.
Printhead Pressure
For the printer to produce a good quality print the printhead must have a good connection to the paper. This is called the printhead pressure. Too low pressure produces a light printout. Too high pressure wears out the printhead prematurely. Note that printhead pressure is only one possible reason for a light printout.
The printhead pressure is set by the blade spring mounted on the back on the printhead profile. This spring may wear out if:
- The printer is lifted by the printhead profile
- The printer is mounted upside down.
Remove the spring and lay it flat on a bench to see if it is bent.
Print Roll
The print roll has two main functions
- Feed the media
- Pressure point to the printhead
As the print roll wears its diameter gradually decreases. This affects the media feed and the printhead pressure. Slippage and/or lighter printout may be signs that the print roll is worn out.
Damaged printroll (e.g. cut marks, or labels stuck to the roll) also have a very negative impact on the print quality and the printhead life.
Media Types
These are the two media media types supported by the Evolabel printers. The type to use very much depends on the use case.
Direct Thermal
With direct thermal printing the printhead heats the media directly. The heat triggers a chemical reaction in the media that results in the media changing color. Some media require more energy to turn black, others are quicker (less energy is needed). The higher the print speed the less energy is adopted by the media. Therefore medias requiring more energy are not suitable for high speed printing. The specifications for a media usually contain max print speed. The media quality has a significant impact on the printer performance.
Thermal Transfer (Ribbon)
With Thermal Transfer technology there is a ribbon between the thermal printhead and the media. The printhead heats the ribbon that releases ink to the media.
The ribbon has two sides, inside and outside. where the inside is facing the core. On all Evolabel printers the ink should be on the inside. I.e. use “ink side in” ribbons.
There are two main technologies of thermal transfer printing; Flat head and Near edge printing. In short the difference is about how the printhead interacts with the ribbon. This has an impact on the ribbon to use. Near edge ribbons give a poor print out on Flat head printers and vice versa. All Evolabel printers are of Flat head type.
For good print quality the ribbon must match the media. For high speed printing good quality ribbon and media are needed. Which kind of label and ribbon material to use is very hard for us to say, it depends on very many factors so here you should contact a company that specializes in this and can help you. There are about 500 different paper and synthetic materials, 150 different adhesives and 50 different backing paper, the combination possibilities are enormous.
Some ribbons generates high amount of ESD during print. Evolabel therefore recommends to use ribbons with an ESD protective coating.
At this link you can find specification of ribbon and label roll.
Ribbon Types
| Material | Suitable label | Pro | Con |
|---|---|---|---|
| Wax | Mainly for paper labels; matte or semi-gloss | Most common and usually provides good print quality regardless of label material | Relatively sensitive to scratches, moisture, oil, chemicals |
| Wax/Resin | Often on very soft or coated paper label | More durable printing than Wax | Sensitive to moisture |
| Resin | Plastic labels ex. Polyester, polypropylene, vinyl | Very durable pressure, ‘lifelong’ | Requires special label materials |
Outer Support Shaft / Stabilizing Bar (Outer)
On some printer models there is a front support shaft. The main purpose is to improve the print quality for ribbon printing. The stabilizing bar connects the ribbon to the media allowing the ribbon ink to be transferred and dried to the media.
The stabilizing bar is spring loaded. The functionality of the bar is reduced if the springs are damaged or the bar cannot move freely. The result of a malfunctioning stabilizing bar is decreased print quality.
Gray Stripe on Label
When using ribbon a gray stripe may appear on top of the label.
The gray line is caused by the ribbon moving at a different speed or direction than the label. To get rid of the line by setting the Ribbon Forward and Backward torque. Increase Forward torque to 35 or more. The perfect setting depends on label size, print speed and ribbon quality.

Barcode Readability
For good barcode readability the lines in 1D barcodes and the pixels in 2D barcodes are to be crisp. There should be a distinct difference between black and white with no fuzzy area in between. How crisp the lines are depends on many factors where the most important are physical media used, contrast and print speed. For thermal transfer printing the combination of media and ribbon used are also of big importance.
1D Barcodes
A 1D barcode can be printed in two directions; picket fence and ladder.
- Picket fence direction means that the barcode lines are printed in the feed direction.
- Ladder direction is then the barcode lines are printed across the feed direction.
For all thermal printers it is easier to print high quality 1D barcodes in picket fence direction.
On a 1D barcode you define the width of the narrow lines (“Modules width” setting in the Editor). The width of the wide lines are then set according to standards and best practice. A thin white line is to have the same width as a thin black etc. Very fine barcodes (with low “module_width” setting) are harder to print at a high quality than one with wider bars. Consequently, it is harder for a barcode reader to decode a fine barcode than a more coarse one. Increasing the Modules width setting should improve the barcode readability.
2D Barcodes
For 2D barcodes the print direction is of less importance than for 1D barcodes. For barcode type PDF417 and other stacked barcodes it may have significance.
Most 2D barcodes consist of square blocks. “Module width” setting in the Editor sets the size of these blocks. Very fine barcodes (with low “module_width” setting) are harder to print at a high quality than one with larger blocks. Consequently, it is harder for a barcode reader to decode a fine barcode than a more coarse one. Increasing the Modules width setting should improve the barcode readability.
